How to Replace a Water Heater Drain Valve (DIY Guide)
Replace a leaking or clogged water heater drain valve in under an hour. Covers removal, choosing brass vs plastic valves, and installation.

April 1, 2026
Safety Disclaimer
Water heater maintenance involves working with pressurized systems, scalding hot water, and potentially hazardous electrical or gas connections. Always shut off power (electric heaters) or gas supply (gas heaters) and allow water to cool to a safe temperature before beginning any maintenance. Wear appropriate safety equipment including gloves and eye protection. If you're uncomfortable with any step, contact a licensed plumber.
Unique angle here: swap the factory plastic valve after the water line is below the port. Clearing a packed bore without cutting a new valve in is how to unclog a water heater drain valve. Confirming the drip is the valve — not the steel shell — is water heater drain valve leaking.
Desk note: Part and plumber-labor dollars below are research ranges from typical hardware and service-call listings, not quotes. This is a HowToDrainAHotWaterHeater.com Editorial Team research-desk sequence from manufacturer drain-valve labels and inspector write-ups, not a shop diary. This desk did not time a 30-minute swap on your tank.
Water heater drain valves are not built to last forever. The factory valve on most tanks is a cheap plastic gate designed to meet the minimum requirement: it opens and closes. After a few years of heat, mineral contact, and occasional use, these valves crack, seize, or start leaking.
Replacing the valve is a parts-bin job if the tank threads are intact and you can get the water below the port. While you are already there, upgrade from the stock plastic valve to a brass ball valve that will outlast the remaining tank life.
Before You Replace the Valve
Do this in order. Buying the SKU first is how people thread a boiler drain cock into a 3/4-inch tank port, or crack a seized plastic body with the tank still full.
- Confirm the drip is the valve. Wipe the jacket and the floor. Fresh water from the hose nipple or the valve-to-tank threads is this page. Water from the steel shell or under the foam is replacement, not a valve SKU — water heater leaking from bottom.
- Get the water below the port. Power or gas off first. Cold inlet closed. A hot faucet open so the tank can take air. The full power-off and cool-down sequence lives on how to drain a hot water heater. No floor drain: how to drain a water heater with no floor drain. If nothing comes out, stop and treat it as water heater not draining before you cut the old valve out of a full tank.
- Read the old threads. Most residential tanks take 3/4-inch NPT into the tank and garden-hose thread on the outlet. Measure the valve you remove. Do not assume a 1/2-inch boiler cock will seal.
- Look at the tank fitting. Stripped or deeply corroded threads are plumber work. The tank fitting is welded to the shell. Snapping it is a flood.
- Then open a listing. The Camco brass drain valve is the garden-hose-thread replacement already used on this site. The HMP 3/4-inch full-port brass ball valve is the wider-bore upgrade already in the parts catalog. Confirm NPT size against the valve you remove. A tagged water-heater brass drain valve search is safer than guessing a third ASIN.
Listing check (brass drain valve): confirm 3/4-inch NPT tank threads plus a garden-hose-thread outlet sold as a water-heater drain valve — 1/2-inch boiler drain cocks and generic plumbing ball valves share the same brass-valve search.
Money story for those Amazon links: how we make money. Parts bin: water heater maintenance tools.
When to Replace the Drain Valve
Replace it when:
- It leaks even when closed. A persistent drip from the valve outlet means the internal seal has failed. Capping the valve is a temporary fix. Replacement is the permanent one. See drain valve leaking.
- It is clogged and cannot be cleared. If the valve bore is packed and unclogging methods have not worked, a new valve with a wider bore is the next step.
- The handle broke or stripped. Plastic handles are fragile. Once the handle is gone, you cannot operate the valve.
- The valve body is cracked. Cracks in plastic valves are common after several years of heat cycles. Once cracked, the valve cannot seal.
- You want to upgrade to a ball valve. Even if the current valve works, a full-port brass ball valve makes future flushing faster and less likely to clog.
Choosing the Right Replacement Valve
Treat the dollar bands as street-price research snapshots, not a quote.
Standard Gate Valve (Plastic or Brass)
This is the same type that came with the heater. A round handle turns a gate up and down to open and close the water path.
| Feature | Plastic | Brass |
|---|---|---|
| Research-range cost | $5–$8 | $8–$12 |
| Durability | A few years in typical heat | Often the remaining tank life |
| Heat resistance | Poor (warps over time) | Excellent |
| Clog risk | High (narrow bore) | Medium (narrow bore) |
| Corrosion resistance | Plastic does not corrode | Brass resists most corrosion |
If you are replacing a gate valve with another gate valve, at least go brass. The few extra dollars buy years of trouble-free operation.
Full-Port Brass Ball Valve
A ball valve uses a lever handle to rotate a ball with a hole through the center. Quarter turn to open, quarter turn to close. The “full-port” designation means the hole through the ball is the same diameter as the pipe, typically 3/4 inch.
| Feature | Full-Port Ball Valve |
|---|---|
| Research-range cost | $15–$25 |
| Durability | Often the remaining tank life |
| Heat resistance | Excellent |
| Clog risk | Low (full bore opening) |
| Operation | Quarter-turn lever |
| Flushing | Faster than a narrow gate on the same hose |
The full-port ball valve is the recommended upgrade. The wider opening reduces clogging, and the quarter-turn operation is faster and more reliable than the multi-turn gate mechanism.
Make sure the ball valve has a garden hose thread on the outlet (3/4-inch GHT). Most valves sold as “water heater ball valves” come with this thread. Standard plumbing ball valves may not have the hose connection.
Tools and Materials
| Item | Purpose | Research range |
|---|---|---|
| Replacement drain valve (match the NPT you measured) | The new valve | $8–$25 |
| Teflon tape (yellow gas-rated or standard white) | Seals the threads | Already owned or a few dollars |
| Pipe wrench or large channel-lock pliers | Removes old valve, installs new one | Already owned |
| Adjustable wrench | Backup grip | Already owned |
| 5-gallon bucket | Catches remaining water during swap | Already owned |
| Garden hose | For draining the tank | See the Flexzilla hose on the unclog page |
| Towels | Manages drips | Already owned |
| Wire brush (small) | Cleans the tank threads | Already owned |
Treat those dollar bands as street-price research, not a quote.
Step-by-Step Replacement
Step 1: Drain the Tank
You must get the water level below the drain valve before removing it. Follow our draining guide for the complete procedure. The short version is:
- Turn off the power (breaker for electric, gas valve to “Off” or “Pilot” for gas).
- Turn off the cold water inlet valve.
- Connect a garden hose to the drain valve and route it to a drain or outside.
- Open the drain valve and a hot water faucet upstairs.
- Wait for the tank to empty (often 20–40 minutes on a valve that actually opens).
If the drain valve is clogged and will not drain, you have a chicken-and-egg problem. In that case:
- Try the unclogging methods first.
- If those fail, loosening (not removing) the valve to create a controlled leak is messy and is how people flood a finished floor. Have buckets and towels ready. If the valve will not budge, stop — that is skip-DIY, not a longer wrench.
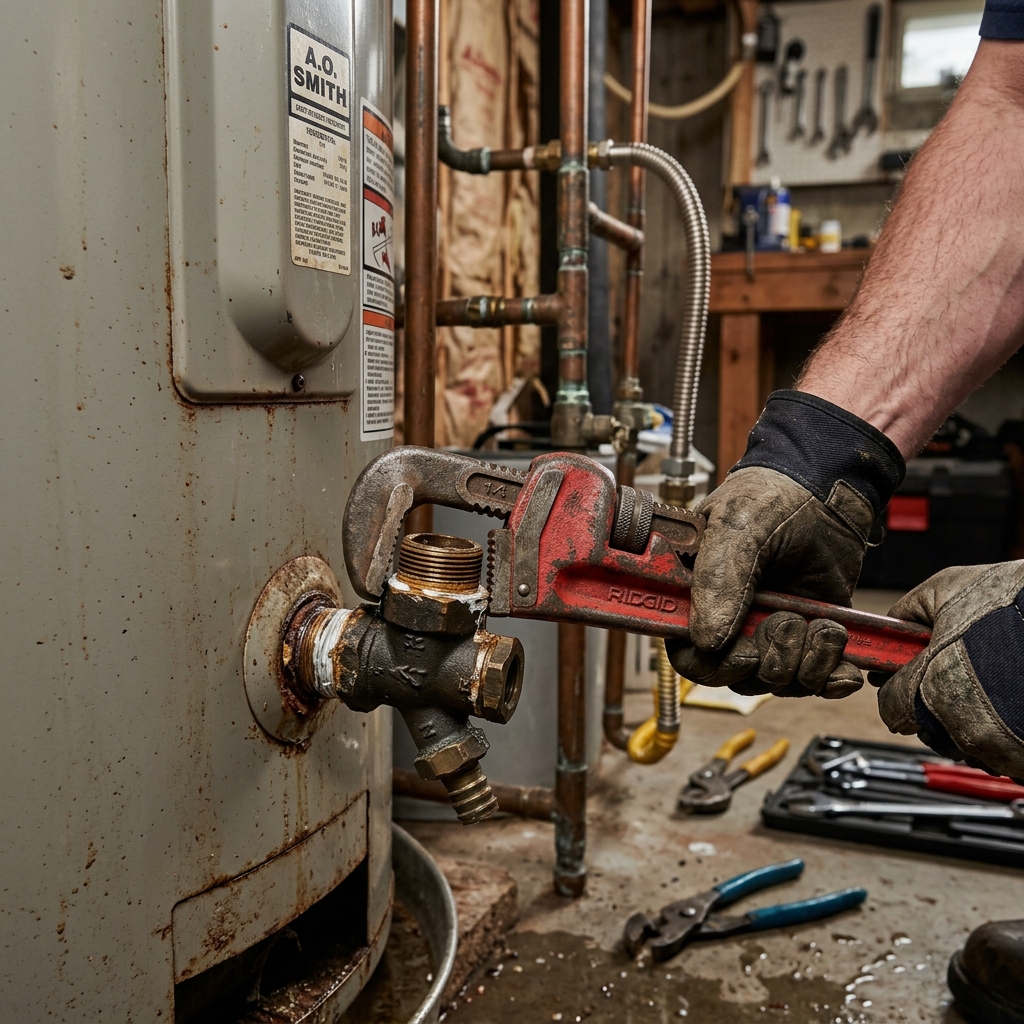
Step 2: Remove the Old Valve
- Place a bucket under the valve to catch any remaining water.
- Grip the valve body (not the handle) with a pipe wrench or channel-lock pliers.
- Turn counterclockwise. The valve is threaded into the tank with pipe threads. It may resist initially if corrosion or old thread sealant has bonded the connection.
- Apply steady, firm pressure. If the valve is stuck, try applying penetrating oil to the threads and waiting 15 minutes before trying again.
- Once the valve is out, some residual water and sediment will flow. Direct it into the bucket.
Step 3: Clean the Tank Threads
With the valve removed, you have access to the threaded fitting in the tank wall.
- Inspect the threads for corrosion, debris, or old Teflon tape.
- Clean the threads with a small wire brush. Remove all old tape and any mineral deposits.
- Check the threads for damage. If the threads are stripped or deeply corroded, the tank fitting needs a plumber. Most of the time the threads are fine.
Step 4: Prepare the New Valve
- Wrap the male threads of the new valve with Teflon tape. Start at the end of the threads and wrap clockwise (as viewed from the threaded end) four to six times.
- Keep the tape tight against the threads so it does not bunch or wrinkle.
- Do not put tape on the first thread. Starting one thread in prevents tape from shredding into the water stream.
Step 5: Install the New Valve
- Thread the new valve into the tank fitting by hand. Turn clockwise until it is hand-tight. This should be about three to four full turns.
- Use the pipe wrench to tighten an additional one to one-and-a-half turns past hand-tight. The valve should point downward (outlet facing the floor) when fully tightened.
- Do not over-tighten. The tank fitting is welded to the tank. Excessive force can crack the weld or damage the threads. Snug is sufficient. The Teflon tape handles the seal.
Step 6: Refill and Test
- Close the new drain valve firmly.
- Open the cold water inlet valve to begin filling the tank.
- Open a hot water faucet upstairs and wait until water flows steadily with no air sputtering. This confirms the tank is full.
- Check the new valve for leaks. Inspect both the valve outlet and the threaded connection to the tank. Dry the area with a towel and watch for any new moisture over the next 10 minutes.
- If there is a small drip at the threads, tighten the valve an additional quarter turn. If that does not stop it, you may need to remove the valve, reapply Teflon tape (more layers this time), and reinstall.
- Restore power. Gas: turn the control to your desired temperature. Electric: flip the breaker.
Warning: On electric water heaters, do not turn on the breaker until the tank is completely full. Running the elements dry will destroy them. Refer to our element testing guide if you suspect damage. Access-panel work is skip-DIY if you cannot isolate the breaker.
Common Mistakes to Avoid
Not draining enough water. If the water level is above the valve when you remove it, you will have an uncontrolled flow of hot, sediment-laden water. Drain the tank as completely as possible first.
Using the wrong Teflon tape direction. Wrap clockwise as viewed from the end of the threads. Wrapping the wrong direction causes the tape to unravel as you thread the valve in, defeating the purpose.
Over-tightening. More is not better with pipe threads. Over-tightening can crack the tank fitting or deform the valve threads. Snug plus one turn with a wrench is the target.
Forgetting to open a faucet during refill. If you do not let air out of the tank through an open faucet, the tank will not fill completely. Air pockets can also cause knocking noises and prevent proper heating.
Skipping the leak check. Do not walk away without spending 10 minutes watching for drips. A small leak at a thread connection is easy to fix now and a disaster to discover days later.
After the Replacement
With a new valve installed, keep it in good working order:
- Operate it at least once a year by opening and closing it during your annual flush. Valves that sit unused for years are more likely to seize.
- Flush the tank on a hardness-and-age schedule to prevent the sediment buildup that clogs valves in the first place. See how often to flush. Method: how to flush hub.
- Keep an eye on the anode rod. A healthy anode rod prevents the corrosion that contributes to valve and tank deterioration.
Skip the Valve Swap, Call a Plumber
- You smell gas, or the T&P is dumping steadily — that is water heater safety, not a drain-valve afternoon
- The valve is seized and will not turn without loading the tank fitting
- Water is coming from the steel shell or under the foam, not the valve
- You cannot isolate an electric tank at the breaker (panel work is not this page)
- The tank sits over finished floor and you cannot control the remaining water
- Threads in the tank fitting look stripped or the weld looks wet
For the DIY-versus-call split: water heater repair: DIY vs. plumber. Symptom index: troubleshooting.
Related Guides
- How to Unclog a Water Heater Drain Valve
- Water Heater Drain Valve Leaking
- How to Drain a Water Heater With No Floor Drain
- Water Heater Not Draining?
- How to Drain a Hot Water Heater
- Water Heater Repair: DIY vs. Plumber
- How to Flush Hub
- Water Heater Maintenance Tools
- Water Heater Troubleshooting
- How We Make Money
Sources
- U.S. Department of Energy, Water Heating, drain-and-flush as maintenance language
- International Association of Certified Home Inspectors, valve standards and inspection guidelines
- Manufacturer use-and-care labels for drain-valve thread size and dry-fire warnings
Editorial Team
Nobody should pay a plumber $300 to turn a drain valve. Our guides are built from manufacturer documentation, plumbing code references, and the documented experience of homeowners and plumbers.