Water Heater Safety: 7 Hazards Every Homeowner Should Know
Prevent burns, gas leaks, and electrical shock around your water heater. A practical guide to the safety checks that actually matter.

February 20, 2025
Safety Disclaimer
Water heater maintenance involves working with pressurized systems, scalding hot water, and potentially hazardous electrical or gas connections. Always shut off power (electric heaters) or gas supply (gas heaters) and allow water to cool to a safe temperature before beginning any maintenance. Wear appropriate safety equipment including gloves and eye protection. If you're uncomfortable with any step, contact a licensed plumber.
Unique angle here: seven hazards — scald, T&P, gas, CO, 240-volt, sediment overheat, tip-over — before you lift a relief lever or open a panel. A puddle at the base is water heater leaking from bottom. A cold tap is hot water heater not working.
Desk note: The 120°F recommendation and the published scald-time figures below come from Energy.gov and CPSC / burn-prevention tables. This desk did not run a calorimeter or a burn lab. Cost figures are research ranges from typical hardware listings, not quotes. This is a HowToDrainAHotWaterHeater.com Editorial Team research-desk sequence, not a shop diary.
Your water heater sits in the basement or garage, doing its job quietly for years. Most people forget about it until something goes wrong. The problem is that the thing stores 40 to 80 gallons of water heated to at least 120 degrees, sometimes pressurized, sometimes fueled by natural gas. Ignoring basic safety checks turns a reliable appliance into a genuine household hazard.
Manufacturer incident reports and plumbing-code cases document tanks that failed after a stuck T&P valve, and burn units treat scalds from water that was set 20 degrees hotter than it needed to be. None of these situations were complicated to prevent. They just required someone to check.
Here are the seven hazards that show up most often in those sources, and what you can do about each one this weekend.
Before You Test the Valve
Do this in order. Capping a dripping T&P discharge pipe is how people defeat the only relief path on a pressurized tank.
- Smell the room before you touch anything. Gas odor: do not flip switches, leave, call the gas company from outside. That is not a soap-bottle afternoon.
- Cut electric heat at the breaker before you open a panel. Use a non-contact tester on the upper connections if you are going in. Breaker labels are wrong more often than people admit. 240-volt work is skip-DIY if you cannot isolate the circuit.
- Measure the tap before you chase a “too hot” story. Run the nearest hot faucet two minutes. Read it with the Taylor Precision waterproof thermometer this site already points at — a liquid probe with a °F scale, not a grill infrared gun. Energy.gov treats 120°F as the usual residential conversation.
- Then test T&P into a bucket, not onto finished floor. Lift two to three seconds. Water should flow and stop. A valve that stays open or never opens is a replacement, not a longer lever hold. The Watts 3/4-inch T&P relief valve is the 150 PSI / 210°F residential valve already used on this site. Match the stamped BTU and probe length to the valve you remove. Leak-vs-pressure diagnosis: how to fix a leaking relief valve.
- If the tank stays in service, add a warning on the floor — not a capped pipe. A TopTes PT520A combustible-gas detector is the portable natural-gas / propane sniffer already in the parts catalog. The Govee WiFi water leak detector three-pack is the pan-and-puck set already used on this site. A tagged T&P relief valve search is safer than guessing a boiler relief ASIN.
Listing check (safety T&P, not a boiler relief): confirm 3/4-inch NPT, 150 PSI / 210°F, and a probe length that matches the valve you lift — boiler and RV relief valves share the same safety-parts search.
Money story: how we make money. Symptom index: troubleshooting.
1. Scalding from excessively hot water
Water at 140 degrees Fahrenheit can cause a third-degree burn in about five seconds. At 120 degrees, it takes roughly five minutes of sustained contact to cause serious injury. The difference matters if you have young children, elderly residents, or anyone with reduced sensitivity in their hands or feet.
What to do: Check your thermostat setting. Most gas water heaters have a dial on the gas control valve near the bottom of the tank. Electric units typically have two thermostats behind access panels on the front. Set both to 120 degrees. What temperature should your water heater be set to? covers the DOE 120°F recommendation versus the 140°F factory default.
If your dial only shows “Warm,” “Hot,” and “Very Hot” without numbers, use a cooking thermometer at the nearest faucet. Run hot water for two minutes, then measure. Adjust the dial in small increments and recheck the next day.
2. T&P valve failure
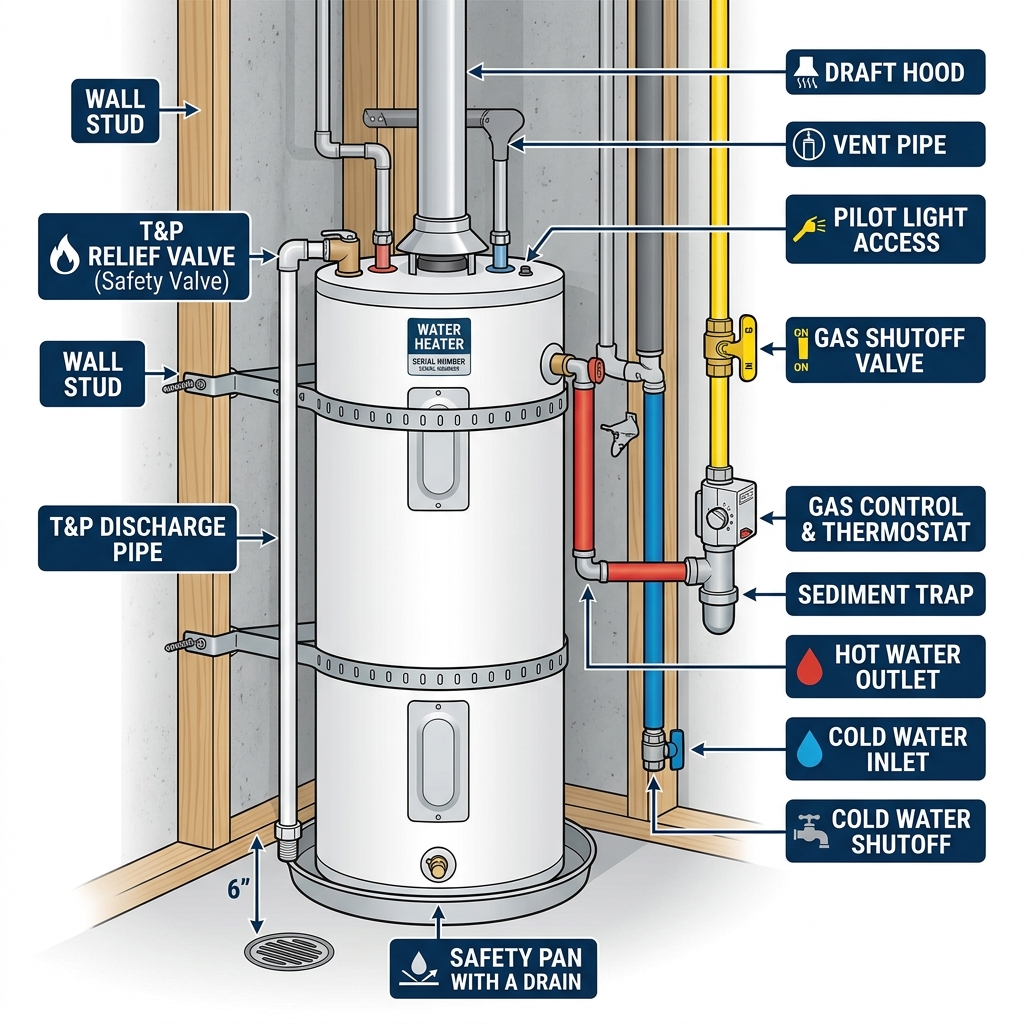
The temperature and pressure (T&P) relief valve is the single most important safety device on your water heater. If pressure inside the tank exceeds safe limits, this valve opens and releases water through a discharge pipe, usually routed to the floor or outside.
When the valve fails, two things can happen. Either it sticks open and drips continuously, wasting water and creating moisture problems. Or it sticks closed, which means the tank has no safety release.
What to do: Test the valve once a year. Place a bucket under the discharge pipe, then lift the lever on top of the valve for two to three seconds. Water should flow out. Let the lever snap back. The flow should stop.
If no water comes out, the valve is likely seized and needs replacing. If water continues dripping after you release the lever, the valve seat is worn. Both are straightforward replacements in a research-range $15 to $20 for the part. The step-by-step is how to fix a leaking relief valve.
One more thing that people overlook: the discharge pipe should run downward to within six inches of the floor or to an exterior drain. It should never be capped, plugged, or routed upward. Homeowners sometimes cap the pipe because it dripped. That defeats the entire purpose of the valve.
3. Gas leaks
Natural gas and propane are treated with mercaptan, the compound that gives them that rotten-egg smell. If you notice that smell near your water heater, do not ignore it.
What to do:
- Do not flip any light switches, use your phone, or create any spark.
- Leave the house immediately.
- Call your gas utility company from outside. They will send someone to check, usually at no charge.
For routine checks, you can inspect gas connections yourself with a spray bottle of soapy water. Brush the solution onto each fitting and connection along the gas supply line. Bubbles mean a leak. Even small leaks need professional attention.
A gas detector mounted near floor level (natural gas is lighter than air, but propane is heavier) gives an extra layer of warning for slow leaks that might not produce an obvious smell.
4. Carbon monoxide from gas water heaters
Gas water heaters produce carbon monoxide during combustion. Normally, the flue and vent pipe carry it outside. Problems start when the vent is blocked, disconnected, or backdrafting due to competing exhaust fans or a poorly designed vent layout.
Signs of backdrafting:
- Condensation or soot stains around the draft hood at the top of the heater
- A persistently yellow pilot flame instead of blue
- Excessive moisture on nearby windows or walls when the heater is running
- CO detector alarms (if you have one installed, which you should)
What to do: Install a carbon monoxide detector within 15 feet of your water heater if you do not already have one. Inspect the vent pipe annually for disconnections, holes, or sagging sections. Make sure the horizontal run slopes upward at least 1/4 inch per foot toward the exterior vent cap.
If your CO detector goes off, treat it like a gas leak: get out and call 911 or your fire department.
5. Electrical hazards on electric water heaters
Electric water heaters run on 240 volts, which is plenty to cause a serious or fatal shock. The risk is highest during maintenance when you are working near water and metal components.
What to do before any work on an electric unit:
- Turn off the dedicated breaker at your panel. It is usually a 30-amp double-pole breaker labeled “Water Heater” or “WH.”
- Use a non-contact voltage tester at the wire connections inside the upper access panel to confirm power is actually off. Breaker labels are wrong more often than you would expect.
- Never assume that turning off the breaker is enough if the label is unclear. Test it.
If you are draining your water heater or replacing a heating element, always kill the power first. Running a dry element with the power on will burn it out within minutes, and you could shock yourself in the process.
6. Sediment-related overheating
Sediment buildup at the bottom of the tank acts as insulation between the burner (or lower element) and the water. The burner fires longer to push heat through the sediment layer, and the bottom of the tank gets much hotter than it was designed to.
Over time, this overheating weakens the steel. You may hear popping or rumbling sounds when the burner fires. Those sounds are steam bubbles escaping through the sediment. It is your tank telling you it is working too hard.
What to do: Flush your water heater annually. If you live in a hard water area, twice a year is better. The process takes about an hour, costs nothing beyond a garden hose, and is the single most effective thing you can do to extend your tank’s life. If you are not sure whether it is time, check these signs your water heater needs flushing.
7. Earthquake and tip-over risk
In earthquake-prone areas, an unsecured water heater can topple. A falling 60-gallon tank full of hot water weighs over 500 pounds. Beyond the impact damage, a toppled gas unit can sever the gas line and crack the flue, creating simultaneous fire and carbon monoxide risks.
What to do: Strap the tank to the wall studs with earthquake straps. Kits are a research-range under $20 at typical hardware listings. Install two straps: one in the upper third and one in the lower third of the tank. This is code-required in California and several other states, but it is a good idea anywhere the ground shakes.
A simple annual safety checklist
You do not need a plumber for routine safety checks. Set a reminder once a year, ideally when you replace your HVAC filter or do other seasonal home maintenance.
| Check | Time needed | Tools |
|---|---|---|
| Thermostat at 120°F | 2 minutes | Thermometer |
| T&P valve test | 2 minutes | Bucket |
| Gas line soap test | 5 minutes | Spray bottle, dish soap |
| Vent pipe inspection | 5 minutes | Flashlight |
| CO detector test | 1 minute | None |
| Earthquake straps tight | 1 minute | Wrench |
| Area clear of flammables | 2 minutes | None |
Keep the area around your water heater clear. No paint cans, no cardboard boxes, no gasoline containers. Gas water heaters have an open flame at the bottom. Three feet of clearance on all sides is the recommendation, though many utility rooms make that tight. Do the best you can, and at minimum keep flammable liquids in a different room entirely.
Skip the DIY Safety Check, Call a Plumber
- You smell gas — leave, call the gas company from outside. Do not soap-test a line that already smells
- The T&P is dumping steadily, or the discharge pipe was capped
- Water is coming from the steel shell or under the foam — water heater leaking from bottom
- You cannot isolate an electric tank at the breaker (panel work is not this page)
- A CO detector is in alarm, or the vent is disconnected / soot-stained at the draft hood
- A fitting is seized and will not turn without loading the tank weld
A cold tap after you shut the heater down: hot water heater not working. Cold after a flush: no hot water after flushing. Popping while it heats: water heater making popping noises.
Related Guides
- Water Heater Leaking from Bottom
- Water Heater Making Popping Noises
- Hot Water Heater Not Working
- No Hot Water After Flushing
- How to Drain a Hot Water Heater
- How to Flush a Water Heater
- How to Flush Hub
- Water Heater Maintenance Tools
- Water Heater Troubleshooting
- How We Make Money
Sources
- U.S. Consumer Product Safety Commission, Water Heater Safety, Federal safety recommendations for residential water heaters
- American Red Cross, Home Fire Safety, Fire prevention guidelines
- U.S. Department of Energy, Water Heating, Temperature settings and energy efficiency recommendations
Editorial Team
Nobody should pay a plumber $300 to turn a drain valve. Our guides are built from manufacturer documentation, plumbing code references, and the documented experience of homeowners and plumbers.