How to Unclog a Water Heater Drain Valve
Clear a clogged water heater drain valve using four proven methods. Covers screwdriver clearing, back-flushing, valve removal, and vinegar soaks.

April 1, 2026
Safety Disclaimer
Water heater maintenance involves working with pressurized systems, scalding hot water, and potentially hazardous electrical or gas connections. Always shut off power (electric heaters) or gas supply (gas heaters) and allow water to cool to a safe temperature before beginning any maintenance. Wear appropriate safety equipment including gloves and eye protection. If you're uncomfortable with any step, contact a licensed plumber.
Unique angle here: four-method escalation through the existing valve before you cut a new one in. If the tank will not empty at all — vacuum, kink, or a handle that will not turn — that is water heater not draining. Replacement after the water line is below the port is how to replace a water heater drain valve.
Desk note: Sediment is the usual plug. Energy.gov and manufacturer manuals tell you to flush. They do not publish a desk-measured clog-rate percent. Time estimates assume the water has cooled and the tank is isolated. This is a HowToDrainAHotWaterHeater.com Editorial Team research-desk sequence, not a shop diary.
A clogged drain valve is the usual obstacle homeowners hit when they try to maintain the tank. You connect the hose, open the valve, and wait. Nothing comes out. Or a weak trickle starts and dies within seconds.
The clog is almost always sediment. The same mineral deposits you are trying to flush out have packed into the valve opening and sealed it shut. This guide covers four methods to clear the blockage, starting with the least invasive.
Before You Unclog the Valve
Do this in order. Buying a “tank descaler kit” first is how people pour vinegar into a full, hot tank and call it a flush.
- Cool the tank and cut the heat. Gas: control to Off or Pilot per the label. Electric: breaker off. Wait at least two hours. Even then, wear gloves. Scalding water through a packed valve is a burn, not a maintenance tip.
- Confirm it is a valve clog, not a setup miss. Hose downhill, no kink, hot faucet open so the tank can take air, valve actually open. Those misses live on water heater not draining.
- Look at the valve body. A cracked plastic valve is a replacement, not a screwdriver job — how to replace a water heater drain valve. A drip at the nipple after you close it is drain valve leaking.
- Confirm a place for the rush. Floor drain, utility sink, window hose, or buckets. No floor drain: how to drain a water heater with no floor drain.
- Then hose. A Flexzilla 5/8-inch by 50-foot garden hose is the hose this site already points at: garden-hose thread, stays flexible in a closet. Do not dump the first hot minutes where a person or pet can step. If the factory valve is why you have been skipping this job, the Camco brass drain valve is the garden-hose-thread replacement already used on this site — install it after the tank is down, not as a “unclog tool.”
Listing check (unclog hose, not a vinegar jug): confirm 5/8-inch garden-hose thread sold for outdoor or utility use — drinking-water RV hoses and “tank descaler” jugs share the same clog-clear browse.
Money story: how we make money. Flush siblings: how to flush hub.
Tools You May Need
Gather these. You may not need all of them, but having them ready avoids mid-job trips.
| Tool / Supply | Purpose |
|---|---|
| Long flat-head screwdriver | Breaks up sediment in the valve |
| Channel-lock pliers or pipe wrench | Removes stuck valves |
| Garden hose (2 sections if back-flushing) | Connects to drain valve and supply |
| 5-gallon bucket | Catches water and sediment |
| Teflon tape | Seals threads on a new valve |
| Replacement brass ball valve | Upgrade from a clogged plastic valve |
| Work gloves (heat-resistant) | Protects against hot water |
| Safety glasses | Prevents sediment splash in eyes |
| Towels | Manages spills |
Method 1: The Screwdriver Break-Through
This is the fastest method and works on light to moderate clogs.
Steps
- Turn off power and cold water supply. For gas heaters, turn the gas valve to “Off” or “Pilot.” For electric, flip the breaker. Close the cold water inlet valve at the top of the tank.
- Open a hot water faucet upstairs. This lets air into the system and helps water flow once the clog clears.
- Remove the garden hose from the drain valve. You need direct access to the valve opening.
- Place a bucket directly under the valve. Position it to catch water that will flow once the clog breaks.
- Open the drain valve fully. Turn the handle counterclockwise until it stops.
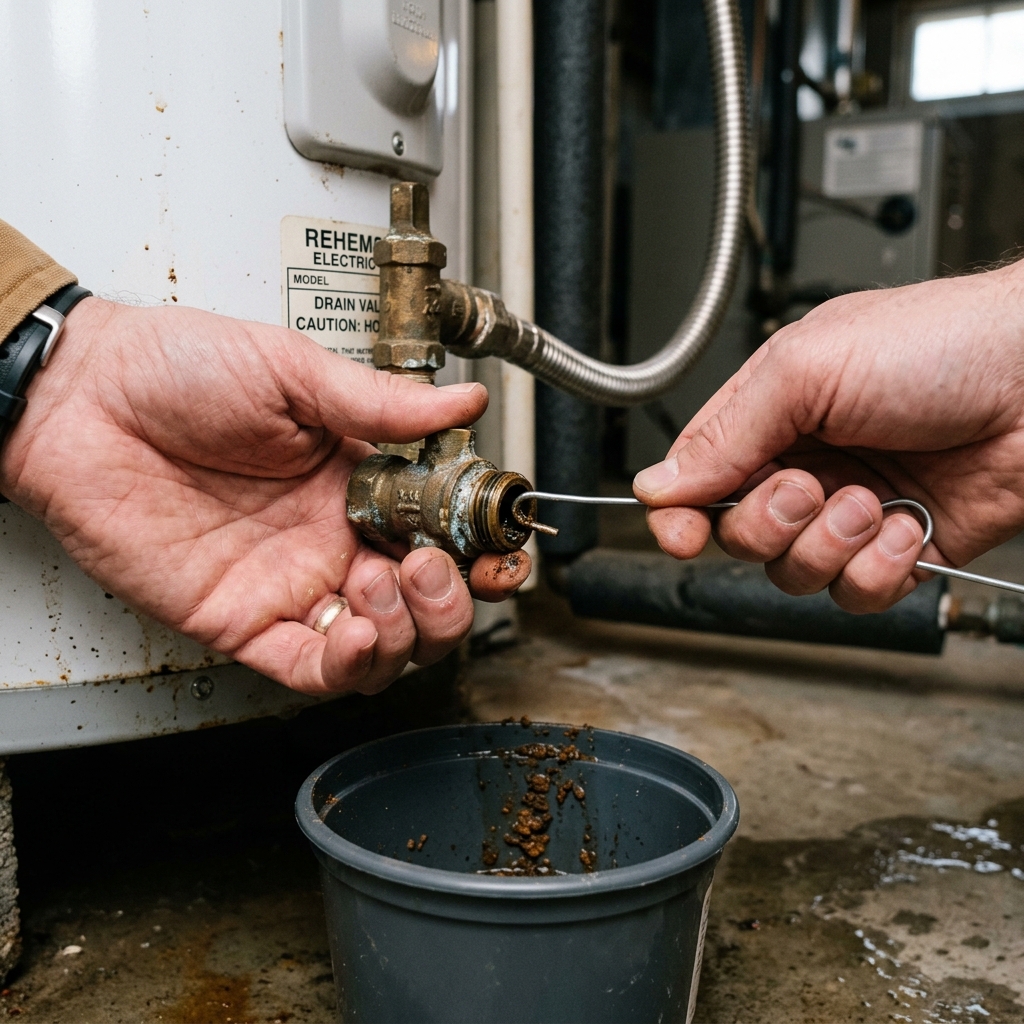
- Insert a long flat-head screwdriver into the valve opening. Push it in gently, about two to three inches.
- Rotate and push. Move the screwdriver in a circular motion to break up the sediment plug. You should feel resistance followed by a crumbling sensation as the deposits break apart.
- Be ready for a rush of water. Once the clog clears, water and sediment will come out fast. Direct the flow into the bucket.
If water starts flowing freely, reconnect the garden hose and proceed with a full tank flush to clear the remaining sediment.
When This Won’t Work
If the screwdriver hits a rock-hard surface and nothing moves, the sediment has calcified. Pushing harder risks breaking the valve (especially plastic valves) or damaging the tank. Move on to Method 2.
Method 2: Back-Flushing
Back-flushing forces pressurized water through the drain valve in reverse, pushing the sediment back into the tank where it can be stirred up and flushed out.
What You Need
- Two garden hose sections
- Access to an outdoor faucet or laundry hookup
- A Y-connector or the ability to connect one hose to the drain valve and one to a water supply
Steps
- Close the drain valve completely.
- Connect a garden hose from an outdoor faucet or laundry supply to the drain valve.
- Make sure the cold water inlet to the heater is closed.
- Open the outdoor faucet fully. This forces house-pressure water (typically 40–60 PSI) backward through the drain valve and into the tank.
- Let it run for 60 to 90 seconds. You should hear water entering the tank.
- Close the outdoor faucet. Disconnect the supply hose from the drain valve.
- Reconnect your drain hose and try draining again.
- Open the drain valve. The reverse pressure should have dislodged the sediment plug.
You may need to repeat this two or three times. Each cycle loosens more material. If water flows after back-flushing, continue with a full drain to get the loosened sediment out of the tank.
For a more detailed walkthrough of this technique, see our complete back-flush guide.
Method 3: Valve Removal
If the first two methods fail, the clog is too dense to clear through the valve. Removing the valve entirely gives you a much larger opening (typically 3/4 inch) to work with.
Warning: Do not attempt this with a full, pressurized tank. Drain as much water as possible first, even if the flow is just a trickle. Turn off the cold water supply and open hot water faucets throughout the house to relieve pressure.
Steps
- Drain as much water as possible through whatever trickle you can get. Even a slow drip will eventually lower the water level if you are patient.
- Have towels and a large bucket or pan ready. When the valve comes out, remaining water will flow.
- Use channel-lock pliers or a pipe wrench to grip the valve body (not the handle).
- Turn counterclockwise. The valve will resist at first if corrosion has bonded the threads. Apply steady pressure. A pipe wrench gives better use than pliers.
- As the valve loosens, water will begin seeping. Be prepared for this to increase to a steady flow once the valve is fully removed.
- With the valve out, reach into the opening with a screwdriver, stiff wire, or coat hanger to break up sediment inside the tank.
- Let the sediment and water drain freely.
- Install a new valve once the tank is empty. We recommend a brass ball valve with a full-port opening. See our drain valve replacement guide.
Dealing With a Stuck Valve
If the valve will not turn at all:
- Apply penetrating oil to the threads where the valve meets the tank. Let it sit for 15 to 30 minutes.
- Use a longer wrench for more leverage — not a cheater pipe that loads the tank weld.
- Apply heat from a heat gun to the area around the valve (not directly on the tank). Heat expands the metal slightly and can break the corrosion bond. Do not use a torch. The tank may have insulation that can burn. If the fitting still will not move, stop. That is plumber work.
Method 4: Vinegar Dissolution
For cases where sediment has calcified into limestone-like deposits, a vinegar soak is the slower chemical path. Manufacturer manuals talk about flushing and, on some tanks, a vinegar clean. They do not publish a desk-measured dissolve time for every crust.
Steps
- Drain or remove as much water as possible from the tank.
- Remove the drain valve (follow Method 3).
- Pour 3 to 4 gallons of white distilled vinegar into the tank. You can use the anode rod port at the top of the tank, or pour directly into the drain opening using a funnel.
- Close the drain opening (reinstall the valve or use a temporary plug).
- Let the vinegar sit for 6 to 24 hours. Longer is better for severe deposits. The acetic acid slowly dissolves calcium carbonate.
- Open the drain and flush with fresh water. The dissolved material will wash out as a cloudy liquid.
- Repeat if needed. Very heavy deposits may require two or three vinegar cycles.
This method requires patience. It handles cases that physical clearing cannot touch. It is not a published efficiency recovery.
Upgrading the Valve to Prevent Future Clogs
If you have gone through this process once, you do not want to do it again. The usual prevention is replacing the standard narrow-bore gate valve with a full-port brass ball valve.
The standard drain valve has an internal passage about 3/8 inch wide. A full-port ball valve has a passage matching the full 3/4-inch pipe diameter. That is a much larger opening, which means sediment is far less likely to block it.
Ball valves also open and close with a quarter turn, making them faster to operate and less prone to the wear that causes leaks in gate valves.
The upgrade is a research-range $15 to $25 for the valve. Installation steps: valve replacement guide.
Prevention Going Forward
Once your valve is clear and your tank is flushed, keep it that way:
- Flush on a hardness-and-age schedule. See how often to flush. Energy.gov treats flushing as maintenance. It does not publish a desk-measured efficiency percent for every tank.
- Check the anode rod every two to three years. A depleted rod lets corrosion add rust to the sediment load, making clogs worse. Here is when to replace it.
- Open and close the valve periodically. Even between flushes, operating the valve once or twice a year keeps it from seizing.
- Consider a water softener if your hardness exceeds 7 grains per gallon. Removing minerals before they reach the tank is the most effective prevention.
Skip the Screwdriver, Call a Plumber
- You smell gas, or the T&P is dumping steadily
- The valve is seized and will not turn without loading the tank fitting
- Water is coming from the steel shell or under the foam
- You cannot isolate an electric tank at the breaker
- The tank sits over finished floor and you cannot control a sudden rush
- A heat-gun pass did not free the threads and you are about to add a torch
For the DIY-versus-call split: water heater repair: DIY vs. plumber. Symptom index: troubleshooting.
Related Guides
- How to Replace a Water Heater Drain Valve
- Water Heater Drain Valve Leaking
- How to Drain a Water Heater With No Floor Drain
- Water Heater Not Draining?
- How to Drain a Hot Water Heater
- How to Flush a Water Heater
- Annual Water Heater Maintenance Checklist
- How to Flush Hub
- Water Heater Maintenance Tools
- Water Heater Troubleshooting
- How We Make Money
Sources
- U.S. Department of Energy, Water Heating, flush-as-maintenance language
- International Association of Certified Home Inspectors, drain valve inspection standards
- Family Handyman, Water Heater Maintenance, unclogging techniques
- Manufacturer use-and-care manuals for drain-valve and dry-fire warnings
Editorial Team
Nobody should pay a plumber $300 to turn a drain valve. Our guides are built from manufacturer documentation, plumbing code references, and the documented experience of homeowners and plumbers.