How to Drain a Water Heater With No Floor Drain
No floor drain near your water heater? Here are five safe methods to drain the tank using a garden hose, sump pump, or bucket relay.

April 1, 2026
Safety Disclaimer
Water heater maintenance involves working with pressurized systems, scalding hot water, and potentially hazardous electrical or gas connections. Always shut off power (electric heaters) or gas supply (gas heaters) and allow water to cool to a safe temperature before beginning any maintenance. Wear appropriate safety equipment including gloves and eye protection. If you're uncomfortable with any step, contact a licensed plumber.
Unique angle here: gravity path, window, sink, pump, or bucket when there is no floor drain. The standard floor-drain power-off sequence stays on how to drain a hot water heater. This page is the no-drain-path sibling only.
Desk note: Gravity needs a downhill run. Energy.gov talks about draining and flushing as maintenance. It does not publish a desk-measured hose-length limit. Pump GPH figures come from manufacturer cards already used on this site, not a basement test from this desk. This is a HowToDrainAHotWaterHeater.com Editorial Team research-desk sequence, not a shop diary.
Most draining guides assume a floor drain two feet away. Millions of tanks sit in a finished basement, a closet, a garage with no drain, or an upstairs utility room. If that is your layout, you are not stuck. You need a different discharge path.
This guide covers five methods for draining a water heater when there is no floor drain nearby, ranked from simplest to most involved.
Before You Drain Without a Floor Drain
Do this in order. Buying a sewage ejector first is how people plumb the wrong pump into a catch bucket.
- Use the main drain guide for heat-off and cool-down. Breaker or gas control first. Cold inlet closed. Hot faucet open so the tank can take air. That sequence is how to drain a hot water heater. This page does not recast that procedure.
- Walk the discharge path. Window, exterior door, utility sink, tub, washer standpipe, or buckets. The entire hose run must go downhill from the drain valve, or you need a pump.
- Look at the valve. A cracked or seized plastic valve is a replacement, not a longer hose — how to replace a water heater drain valve. A packed bore is how to unclog a water heater drain valve. Nothing coming out at all is water heater not draining. A drip after you close it is drain valve leaking.
- Protect finished floor. Towels or a drop cloth along the hose path. Hose connections drip. Fifty gallons on hardwood is the failure mode.
- Then hose or pump. A Flexzilla 5/8-inch by 50-foot garden hose is the hose this site already points at: garden-hose thread, stays flexible in a closet. If gravity cannot reach a downhill outlet, the Superior Pump 1/4 HP submersible utility pump is the utility-pump SKU already in the parts catalog: garden-hose adapter, used here as a transfer pump out of a catch basin, not as a sewage ejector.
Listing check (utility pump vs sewage pump): confirm a compact utility / transfer pump with a garden-hose adapter — sewage ejector pumps and HVAC condensate pumps share the same “utility pump” search.
Money story: how we make money. Parts bin: water heater maintenance tools.
The Challenge
A standard 50-gallon water heater contains roughly 400 pounds of water. That water needs to go somewhere. The drain valve on the heater uses gravity to move water through a garden hose to a lower point. If there is no lower point nearby, gravity is not on your side.
The solution depends on what you do have access to:
- A window to the outside
- A utility sink or laundry sink
- A bathroom within hose reach
- A sump pit or a utility pump
- Buckets and patience
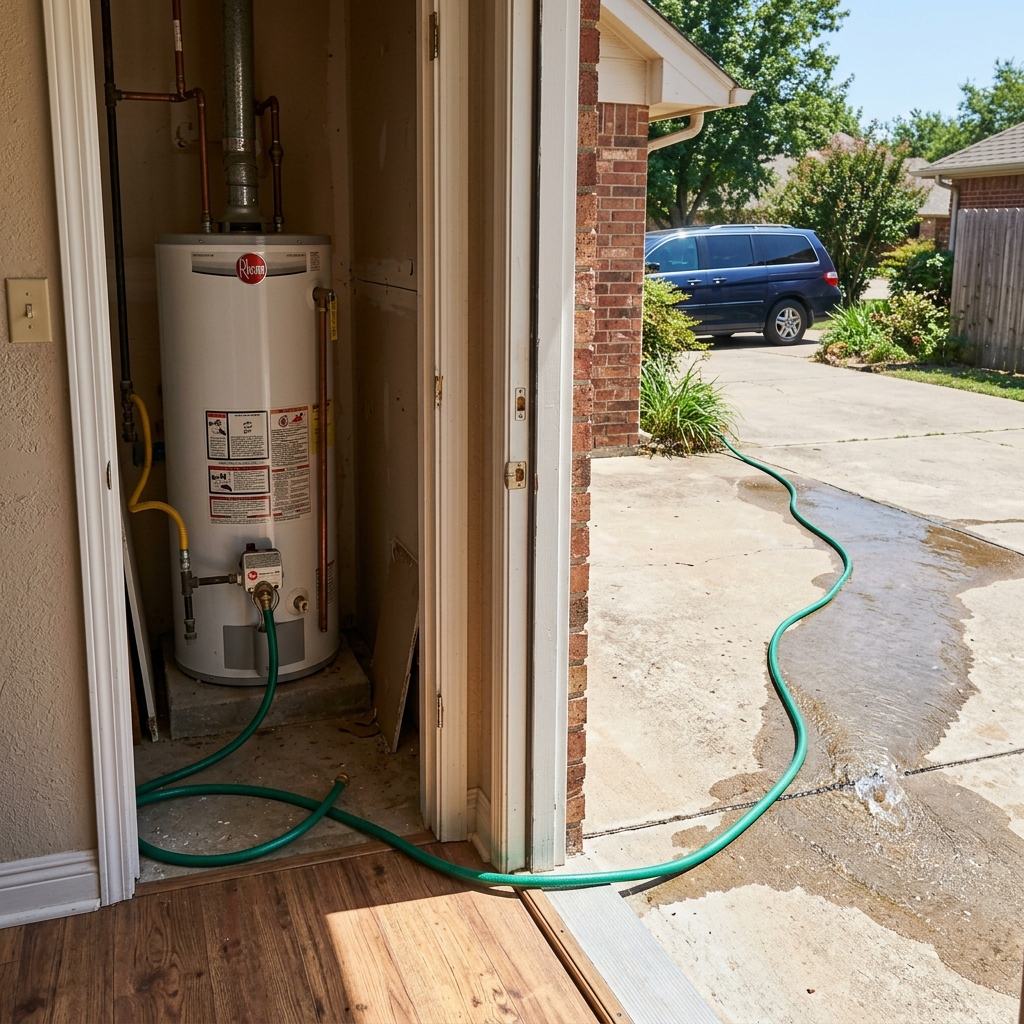
Method 1: Run the Hose to an Outside Door or Window
If there is a window, sliding glass door, or exterior door within garden hose reach of the water heater, this is the simplest option.
Steps
- Shut off the power and cold water supply as described in our draining guide.
- Let the water cool for at least two hours.
- Connect a garden hose to the drain valve.
- Route the hose to the nearest window or exterior door. Open the window enough for the hose to pass through. If you are going through a finished area, lay towels along the path in case of drips at connections.
- Make sure the hose end is lower than the drain valve. If the window is at ground level and the water heater is in the basement, you may need a pump (see Method 4).
- Direct the hose away from the foundation. Aim it at least three feet from the house to avoid water pooling against the foundation wall.
- Open the drain valve and a hot water faucet in the house to allow air in.
- Let the tank drain completely. A 50-gallon tank often takes 20 to 40 minutes through a standard garden hose when the valve is clear.
Tip: If the hose path includes any upward rises, even a few inches, the siphon will break and draining will stop. The entire run must go downhill from the drain valve to the hose end.
Method 2: Drain Into a Utility Sink or Bathtub
If there is a sink, laundry tub, or bathtub within hose reach of the water heater, you can drain directly into it. The drain in these fixtures connects to the same sewer system that a floor drain would.
Steps
- Shut off the power and cold water supply.
- Let the water cool.
- Connect the garden hose and route it to the sink or tub. Secure the hose end inside the basin so it cannot flip out from the water flow.
- Open the drain valve slowly. Start with a partial opening to control the flow rate. A full-blast 50-gallon drain can overwhelm a small sink basin if the sink drain cannot keep up.
- Monitor the sink. Make sure the water level does not rise to the point of overflowing. If it does, partially close the drain valve to reduce the flow.
Watch the Temperature
Even after two hours of cooling, the water may still be warm. Running warm, sediment-laden water through a porcelain sink or bathtub will not usually damage it, but the sediment can leave stains on light-colored surfaces. Rinse the basin thoroughly after draining.
Method 3: The Bucket Relay
This is the no-tools, no-hose fallback. It works for everyone, regardless of layout.
Steps
- Shut off the power and cold water supply.
- Let the water cool thoroughly. Since you will be handling buckets of water, you want the temperature below about 100°F.
- Place a 5-gallon bucket under the drain valve.
- Open the drain valve and fill the bucket. A 5-gallon bucket often fills in about two to three minutes on a clear valve.
- Close the drain valve.
- Carry the bucket to the nearest drain point (toilet, sink, outside) and empty it.
- Return and repeat. A 50-gallon tank requires about 10 trips.
Making It More Efficient
- Use two buckets. While one fills, carry and empty the other.
- Recruit a helper. One person manages the valve, the other carries.
- Use a hand truck or dolly for carrying. Five gallons of water weighs about 42 pounds, and 10 trips add up.
- Drain into the toilet. If a toilet is close, you can pour the bucket directly into the bowl. The extra volume triggers a flush cycle and the water goes straight to the sewer.
The bucket method is slow, but it requires zero equipment beyond what most households already have.
Method 4: Use a Utility Pump
A small utility pump or transfer pump eliminates the gravity problem entirely. The pump pushes water uphill through a hose to any drain point, window, or outdoor location.
What You Need
- A utility pump (the Superior Pump SKU above is a research-range $50–$80 street snapshot, not a quote)
- A short hose from the drain valve to a bucket or catch basin
- A second hose from the pump to your chosen drain point
Steps
- Shut off the power and cold water supply.
- Let the water cool.
- Connect a short hose from the drain valve to a bucket or plastic storage tub. The pump will sit in this container.
- Place the utility pump in the bucket. Connect its discharge hose and run it to your drain point (sink, outside, etc.).
- Open the drain valve. Water flows into the bucket by gravity.
- Turn on the pump. It pushes the water uphill and out. Manufacturer cards for compact utility pumps often cite on the order of 10 to 30 gallons per minute — confirm the card on the listing you open. That is not a basement measurement from this desk.
- The pump cycles on and off as the bucket fills and empties. Some pumps have an automatic float switch. Manual pumps need you to turn them on and off.
This is the fastest method for situations where you cannot gravity drain. If you already have a sump pump in the basement, you can drain into the sump pit and let the existing pump handle the rest — only if that pit is meant to take this water.
Pump Notes
Any compact submersible utility pump with a garden-hose adapter will handle this job if the listing matches the check above. Wayne, Superior Pump, and Flotec all make models in this class. You will use the same pump for future flushes and emergency dewatering. It is not a sewage ejector and not an HVAC condensate pump.
Method 5: Use the Washing Machine Drain
If your water heater is near the laundry area, the washing machine standpipe (the vertical drain pipe the washer hose hooks into) is an available drain point.
Steps
- Disconnect the washing machine drain hose from the standpipe.
- Insert your garden hose into the standpipe. Feed it in a few inches so it stays put.
- Route the garden hose from the water heater drain valve to the standpipe.
- Open the drain valve.
The standpipe connects to the home’s drain-waste-vent system, same as any sink or floor drain. The water flow rate from a water heater drain valve is well within what the standpipe can handle if you start slow.
Important: Gravity drain needs the hose discharge lower than the drain valve. A typical laundry standpipe rim sits about 34 to 36 inches while the heater drain valve sits at 6 to 12 inches, so the water still has to climb. If the run goes uphill, use the pump. If you can drop the hose into a floor-level receptor or a nearby sink that is lower than the valve, gravity works.
Tips for All Methods
Let the water cool. This matters even more when you are handling hoses and buckets in living spaces. Burns, scalded floors, and damaged furniture are real risks with hot water.
Protect the floor path. Lay towels or a plastic drop cloth along the route from the heater to your drain point. Hose connections drip. Valve connections drip.
Flush after draining. Once the tank is empty, briefly open the cold water supply to stir up remaining sediment, then drain again. Two or three short flush cycles produce a much cleaner tank than a single drain. See our flushing guide and the how to flush hub.
Secure the hose end. Wherever the hose terminates (sink, window, bucket), make sure it cannot slip out. A hose under water pressure can snake around.
Consider Installing a Drain Solution
If you plan to maintain the heater (and you should), draining it once or twice a year with the bucket method gets old. Consider one of these permanent solutions:
- Install a condensate or transfer pump on a dedicated catch. A small pump near the water heater can permanently solve the drainage problem if you plumb it on purpose. HVAC condensate pumps are a different SKU and a different flow class — match the listing check above.
- Add a drain pan with a drain line. A drain pan under the water heater with a 3/4-inch line routed to the nearest drain protects against leaks and gives you a convenient drain point for future maintenance. A Camco drain pan is the pan this site already points at.
- Relocate the water heater during your next replacement. If you are within a few years of needing a new water heater, discuss placement options with your installer.
Skip the Hose Relay, Call a Plumber
- You smell gas, or the T&P is dumping steadily
- The valve is seized or cracked and you cannot open it without loading the tank fitting
- Water is coming from the steel shell or under the foam
- You cannot isolate an electric tank at the breaker
- Every discharge path goes uphill and you do not have a pump you trust
- The tank sits over finished floor and a slipped hose would flood the room
Symptom index: troubleshooting. DIY-versus-call: water heater repair: DIY vs. plumber.
Related Guides
- How to Replace a Water Heater Drain Valve
- How to Unclog a Water Heater Drain Valve
- Water Heater Drain Valve Leaking
- Water Heater Not Draining?
- How to Drain a Hot Water Heater
- How to Flush a Water Heater
- Water Heater Safety Guide
- Annual Water Heater Maintenance Checklist
- How to Flush Hub
- Water Heater Maintenance Tools
- Water Heater Troubleshooting
- How We Make Money
Sources
- U.S. Department of Energy, Water Heating, drain-and-flush as maintenance language
- International Association of Certified Home Inspectors, drain pan and overflow requirements
- Manufacturer utility-pump cards for garden-hose adapter and GPH bands already used on this site
Editorial Team
Nobody should pay a plumber $300 to turn a drain valve. Our guides are built from manufacturer documentation, plumbing code references, and the documented experience of homeowners and plumbers.