Water Heater Thermostat Adjustment Guide
How to adjust your water heater thermostat for safety, efficiency, and comfort. Covers gas and electric models, ideal temperature settings, and troubleshooting.

May 25, 2026
Safety Disclaimer
Water heater maintenance involves working with pressurized systems, scalding hot water, and potentially hazardous electrical or gas connections. Always shut off power (electric heaters) or gas supply (gas heaters) and allow water to cool to a safe temperature before beginning any maintenance. Wear appropriate safety equipment including gloves and eye protection. If you're uncomfortable with any step, contact a licensed plumber.
Unique angle here: the gas-knob versus electric-panel walkthrough, after you measure the tap. The two-camp 120-vs-140 list is what temperature should your water heater be set to. The longer balance argument is water heater temperature settings.
Desk note: The 120°F recommendation, the “about 3–5 percent per 10°F” energy language, and the scald-time figures below come from Energy.gov, published burn-time tables, and Legionella guidance (OSHA / CDC style). This desk did not run a calorimeter or invent an annual $590 bill. Dollar tables that pretend every 50-gallon electric tank costs the same are not on this page.
Most households never open the access panel or turn the gas dial after install. The useful first move is a glass of hot water and a probe. The dial is second.
Before You Turn the Screwdriver
Do this in order. Opening an electric panel with the breaker still on is the usual skip-DIY.
- Measure the tap, then look at the control. Run the hot faucet closest to the heater for two to three minutes. Fill a glass. Read it with an instant-read probe. The Taylor Precision waterproof thermometer is a liquid probe with a °F scale — that is the buying note. A grill infrared gun reads the glass, not the water.
- Copy the current mark. Gas: letter, triangle, or printed °F on the control valve. Electric: both thermostat dials behind the side panels. Letter codes are not precision marks.
- Note who uses the showers and the dishwasher. Children, older adults, and an old dishwasher without a booster change the target. Details stay on the two setpoint siblings.
- Confirm the fuel and the power-off path. Gas: you are turning a knob on the valve, not opening 240-volt panels. Electric: breaker off, then a non-contact tester on the terminals before any screwdriver.
- Then adjust one step and re-measure after the tank recovers (usually two to three hours).
Listing check (adjustment thermometer): confirm an instant-read food or liquid probe with a °F scale — grill-only infrared guns and pool testers share the same thermometer search.
If the glass already reads over 140°F with the dial in the middle, stop shopping a blanket. That is a stuck thermostat or a shorted element — how to test a water heater element and hot water heater not working.
Why the Setting Matters
Safety. Published burn-prevention tables put 140°F water in the “seconds, not minutes” range for a serious burn, and 120°F in the “minutes of contact” range. Those are literature figures, not a staged burn test.
Energy. Energy.gov discusses about 3–5 percent water-heating energy per 10°F you drop the setpoint, and treats water heating as a meaningful slice of a home’s energy use. That is published guidance. It is not a promise your bill drops $60.
Sediment. Higher storage temperatures speed mineral precipitation. A hotter tank is not a substitute for a flush schedule — how often to flush a water heater.
Bacteria. Legionella guidance puts the growth band in lukewarm water (high-70s to low-110s °F). Energy.gov still points most healthy households at 120°F storage. Immunocompromised residents and long unused pipe runs are the usual reason people store hotter and temper at the tap.
The Right Temperature: 120°F for Most Homes
The Department of Energy and most residential manuals point at 120°F (49°C) for ordinary houses:
- Lower scald risk than a factory 140°F tank
- Slows growth compared with lukewarm storage
- Slows scale relative to a hotter tank
- Enough hot water when the tank is healthy and sized
When 130°F Shows Up
- An older dishwasher with no booster
- A household that wants extra Legionella margin
- Long pipe runs where the glass at the far tap is 5–10°F below the tank
- You run out of hot water at 120°F and the tank is not full of sediment (flush first)
Do Not Chase 140°F+ as a Comfort Fix
Residential houses that store at 140°F for Legionella or a recirculation loop still need mixing (tempering) at the tap. Turning the dial to “very hot” to stretch a 40-gallon tank is how people scald a bathroom that has no mixing valve. Never treat 140°F as a default “more hot water” setting.
For the camp list and the longer risk grid, use the two siblings linked above.
How to Adjust a Gas Water Heater Thermostat
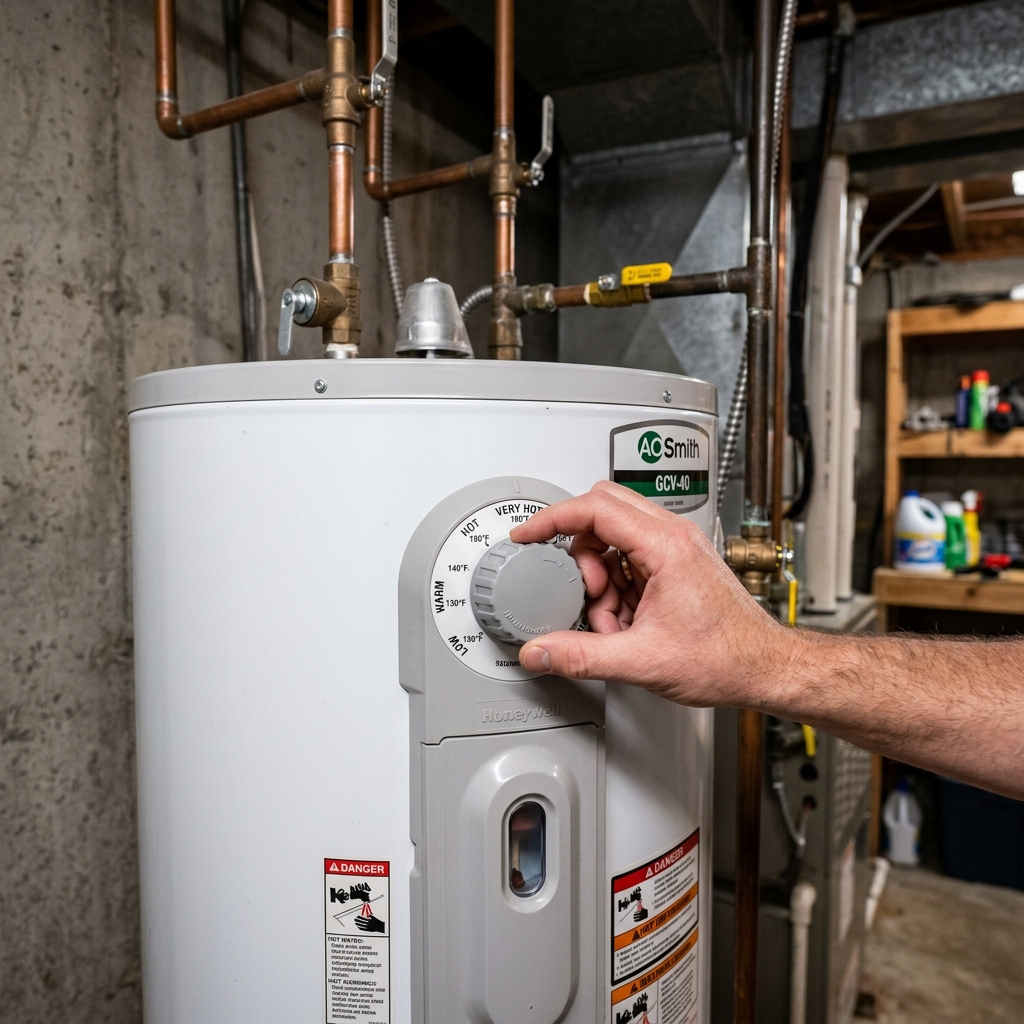
The control is on the gas valve, low on the front of the tank.
Step 1: Locate the Control Knob
Look for a round knob with:
- Printed °F marks, or
- Letters / symbols (A, B, C or Warm / Hot / Very Hot), or
- A vacation or low setting
Step 2: Move One Notch
For most homes, 120°F or the “warm” mark is the starting target. Letter codes vary by brand. A / B / C are not a universal 120 / 130 / 140. Believe the glass.
Step 3: Verify After Recovery
Wait two to three hours. Run the nearest hot faucet two to three minutes. Measure the glass. If you are more than about 5°F from the target, move one notch and wait again.
If you smell gas at any point, stop. Leave the area and call the gas utility. Do not keep turning the knob.
How to Adjust an Electric Water Heater Thermostat
Electric tanks hide one or two thermostats behind side panels. This is a 240-volt job.
Step 1: Turn Off Power
Flip the water-heater breaker off. Do not skip this. Verify with a non-contact voltage tester at the thermostat terminals before you touch a screw.
Step 2: Remove the Access Panel
Take off the panel screws. Fold the fiberglass batting aside. Two panels means two thermostats and two elements. The upper thermostat is the primary control.
Step 3: Find the Adjustment
A small screw or dial with °F marks. Flat-head screwdriver.
Step 4: Set Both Thermostats the Same
Mismatched upper and lower setpoints cause uneven heat and trip the high-limit (ECO) reset. Turn both to the same number.
Step 5: Restore Insulation and Panels
Push the batting back. Replace the panels. The insulation keeps the thermostat from reading closet air.
Step 6: Restore Power and Test
Breaker on. Wait two to three hours. Measure the glass the same way as the gas procedure.
Do not dry-fire an empty electric tank. If you drained it for other work, refill first — how to drain an electric hot water heater.
Troubleshooting Thermostat Problems
Water Is Too Hot on a Low Setting
- The thermostat is not opening at the setpoint
- Electric: a fused contact keeps the element on
- Gas: the valve is not shutting the burner down
Drop the control to its lowest mark. If the glass stays scalding after several hours, the control has failed. Gas-valve replacement is usually a plumber job.
Water Never Reaches the Setpoint
- Broken dip tube (cold enters and leaves the top)
- Electric: failed lower element (a little hot water, then cold)
- Sediment insulating the burner or element
- A drifted thermostat
If the glass and the dial disagree by more than about 15°F, test elements or have the gas valve inspected. Flush before you replace parts on a guess — how to test a water heater element.
The High-Limit Reset Keeps Tripping
The red ECO on the upper electric thermostat opens around 170°F and kills power.
Usual causes: setpoint too high, a thermostat that will not open, a shorted element, or upper and lower set to different numbers.
- Breaker off. Press the reset (it clicks).
- If it trips again in a few hours, test the elements.
- If elements test good, replace the thermostat.
A residential electric thermostat is a research-range $10–$25 part. Search pages mix RV 120-volt stats and heat-pump boards. Use a tagged electric water heater thermostat search and match the mounting and terminal layout to the old piece. Do not invent an ASIN.
Temperature Swings
Gas: tired thermocouple or thermopile — pilot light guide.
Electric: a half-dead element or a loose terminal. Tighten with the breaker off, then meter the elements.
Both: heavy sediment delays the sensor. Flush the tank.
Tankless setpoint lives on the digital panel in 1°F steps. Flow-rate limits are a different page: tankless water heater pros and cons.
Skip the Adjustment, Call a Plumber
- Any smell of gas
- An electric panel you cannot verify dead
- ECO that trips again after a reset and a meter check you do not want to do
- Glass over 140°F that will not drop after the lowest setting
- A T&P that dumps when you change the dial
- You are turning the dial up to hide a tank that is already leaking — how long water heaters last
After any setpoint change, lift the T&P lever briefly and confirm it opens and reseats. Whole-house hazards: water heater safety.
Related Guides
- What Temperature Should Your Water Heater Be Set To?
- Water Heater Temperature Settings
- How to Insulate a Water Heater
- How Often Should You Flush a Water Heater?
- How Long Do Water Heaters Last?
- Tankless Water Heater Pros and Cons
- How to Test a Water Heater Element
- Water Heater Pilot Light Guide
- Water Heater Repair: DIY vs. Plumber
- Flush Schedule Calculator
Sources
- U.S. Department of Energy, Water Heater Temperature, recommended settings and energy language
- CDC Legionella Prevention, temperature guidance
- Manufacturer electric-panel and gas-valve labels for 240-volt and lighting warnings
Editorial Team
Nobody should pay a plumber $300 to turn a drain valve. Our guides are built from manufacturer documentation, plumbing code references, and the documented experience of homeowners and plumbers.